It begins….
A BIG item on my list of items to get done for a while has been to learn how to test a GUI, automatically of course. I’ve done a bit of research to find out what would be the best method to go about trying to implement this. I’ve looked through various scripting languages like AutoIt, possibly using a module and .NET through PowerShell and also C#.
What I finally decided to devote time into and giving a REAL shot was via C# and CUITs (Coded User Interface Tests). Visual Studio features a pretty awesome ability to record the actions you take while testing your GUI and then generates the code necessary. Once the code is generated you are able to freely edit it to your needs, such as adding a loop to turn adding an item once into adding it 5, 10, 50+.
What’s Needed?
Visual Studio Ultimate or Premium.
An application or web page to test.
A wee bit of C# knowledge (I’ve only been at this for ~month).
A bit of time.
Let’s Dig in.
To start creating a CUIT, a CUIT project needs added to the application solution. To add a new project, Right-Click on the Solution in the Solution Explorer and click Add -> New Project.


After you click OK to create a project, you’ll be prompted to choose the way in which you wish to add the CUITs to the project. Especially for the first time (since there are no tests to import) we’ll want Record Actions, edit UI map or add assertions.

After clicking OK on this one, Visual Studio will minimize and this box will appear

This is the little guy that records the actions you make on the GUI. The application that I’m going to show this off with will be a very simple one. All it has is the current version # in a text box and a button that displays a message box upon being pressed.


(The message on the main window is just because it’s a ClickOnce application I was testing to verify that it’ll update on it’s own upon launching 😀 Which works 😀 )
So now we’ve got an application open and the CUIT builder. To begin testing, simply click the red circular button. The builder when begin to record any apps you open, the clicks you make and any strings entered into a form. For my app, I simply want to open it, click start, click the OK button on the message box that appears and then close it again.
Recording is as simple as it sounds.
Step 1. Click the Record Button

Step 2. Double Click the App

Step 3. Click Start

Step 4. Click OK

Step 5. Click Close on the app
Step 6. Click Generate Code on the CUIT Builder

Once you hit Generate Code, you’ll be prompted to name the method that’s about to be created and add a little description.

Finish up by clicking Add and Generate – VOILA!
Close the CUIT Builder and Visual Studio will now appear. You might notice that some code has been generated for you now.

To actually execute your test, you’ll need to Build the Solution (In Solution Explorer, R-Click the Solution -> Build) and then open the TEST explorer (if you don’t see it, click the TEST tab up top from the menu hover over Windows -> TEST explorer). You should see a dropdown called CodedUITest1 with CodedUITestMethod1 under it.

R-Click ‘CodedUITestMethod1’ and choose ‘Run Test’ – BOOM! Auto-Mation at your finger tips!
—— 10/29/2014 UPDATE —–
Refer to https://phillipwolf91.wordpress.com/2014/10/08/cuit-getting-started-with-data-driven-tests/ on how to create Data Driven tests in order to have a test run multiple times with different values .
The code below does technically work, but it requires moving the code from UImap.uitest to UImap.cs (which I didn’t outline because at the time I didn’t know). Doing so will greatly reduce the ease in editing these tests as it gets much more code intensive. If you don’t move the code over (by right clicking the method name on UIMap.uitest and choosing move code) then anything you do will be overwritten the next time a test is recorded.
——————————————-
Now, you may recall at the top saying that you need a little bit of C# knowledge. That part comes next.
What if I wanted to do that test more than once without having to click run over and over? Loops, duh!

But this didn’t work out exactly like I was expecting it too! The first time I ran it with no issues, and now, it’s throwing errors! (Unfortunately I can’t show the actual error because I fixed it and forgot to get the exception message and now I can’t reproduce the error >.<)
The application was failing to close so I took a look see at what the Generated Code came up with.
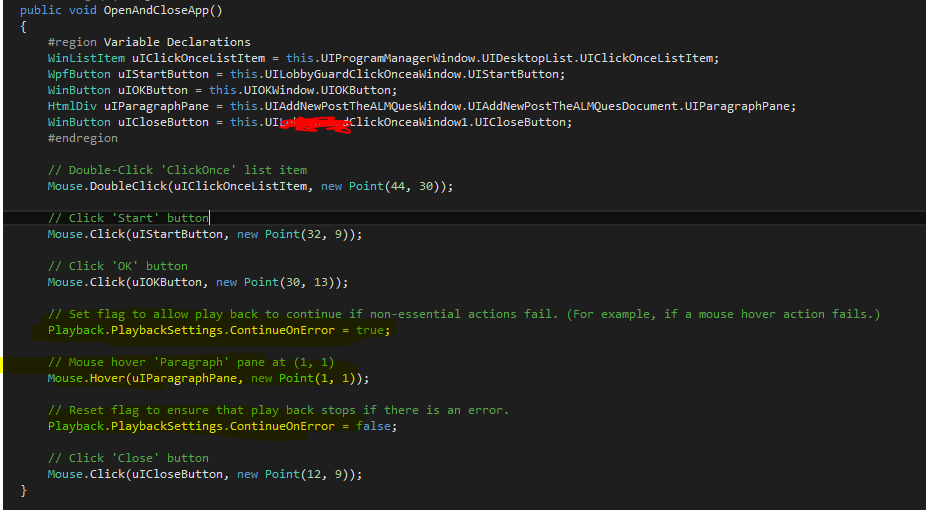
I noticed four lines of code that didn’t look right for what I wanted. The first being the top where the uIParagraphPane is defined as a HtmlDiv type. It has the name of my blog in it. I definitely didn’t mean to do that. The three highlighted parts of the image is what actually interacts with uIParagraphPane which means I don’t want that either. The Playback.PlaybackSettings.ContinueOnError obviously wasn’t doing it’s job too well on that attempt (though it most likely worked after I removed my fix seeing as it didn’t happen again). So, I removed those lines. No more error!
While we’re at it, why don’t we add another loop to click the START and OK buttons 4 times each time the app opens and closes as well?

All I had to do was find the line that clicks the start button and the line that clicks the OK button then encase them within a for loop!
This is what I’ve been able to master after only -2- days of working with this stuff and very minimal knowledge of C# and reading exceptions.
I’ll follow this post up with how to implement the same test on another PC that DOES NOT have Visual Studio Premium/Ultimate installed.
UPDATE 9/18/2014 — If you have any question regarding CUITs, FIRE AWAY! I’ve got a lot more experience with them now.
